Have two assistants hold the trunk lid open, loosen the lock nuts and remove the trunk lid from the vehicle.
Installation is carried out in the reverse order of removal. With two assistants, install the trunk lid and screw in the lock nuts by hand.
Close the trunk lid, check its position in relation to adjacent surfaces and, if necessary, adjust its position, then finally tighten the nuts.
Trunk lid lock
To access the lock, remove the decorative upholstery panel.
On sedan or coupe vehicles, remove the fuse.

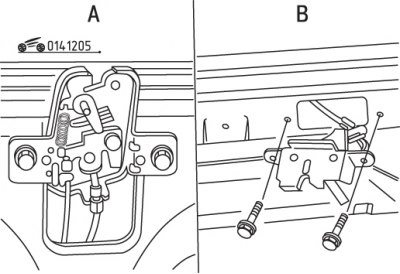
Pic. 12.5. Elements for fastening the cable and locking the trunk lid: A - sedan and coupe models; B - hatchback models
To access the lock drive cable, unscrew the bolts and move the lock to the side (pic. 12.5).
Disconnect a cable and draft of a drive of the lock and remove the lock from the car.
Installation is carried out in the reverse order of removal.
Trunk lid impact plate
To access the impact plate of the trunk lid, remove the decorative upholstery panel.
Mark with a marker the position of the bolts securing the shock plate of the trunk lid.
Turn out bolts and remove a shock plate.
Installation is carried out in the reverse order of removal. Adjust the striker plate if necessary. This can be done by tightening or loosening the bolts until the desired trunk lid position is reached.
Trunk lid and filler cap opening mechanism
In the passenger compartment, to access the release lever mounting bolts, remove the trim, pull out the clips and unscrew the carpet.
Turn out a bolt and disconnect a cable from the lever.
At the rear of the vehicle, to access the opening mechanisms, remove the upholstery trim panel.
Disconnect the cable from the trunk lock.

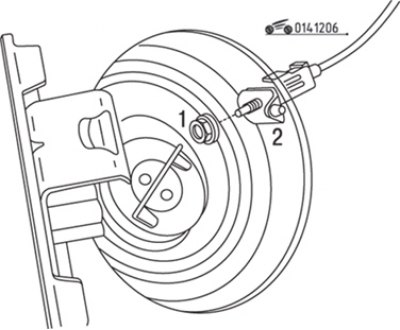
Pic. 12.6. Elements for fastening the cable to the filler cap: 1 - nut; 2 - bracket
Disconnect the filler cap cable from the bracket and pull the cable to open the cap. Loosen the nut and disconnect the cable (pic. 12.6).
Attach a thin cord to the trunk lid and/or filler opening cable and pull the cable into the vehicle interior. A cord will be required to pull the new cable into place.
Tie a cord to the new cable and pull it into place.
Further installation is carried out in the reverse order of removal.
