Removing
1. Relieve pressure in the fuel system (see chapter 4).
2. Disconnect the negative cable from the battery.
Warning! If your car has an anti-theft audio system, make sure you have the unlock code before disconnecting the battery.
3. Sing coolant (see chapter 1).
4. Remove the intake duct. Disconnect the accelerator cable, hoses and electrical connectors from the throttle body. The throttle body does not interfere with the removal of the manifold and can be removed with the throttle body.
5. Tag and unhook all wiring harnesses and hoses from the intake manifold.
6. Disconnect electric sockets from atomizers. Disconnect the fuel supply and return hoses from the fuel rail (see chapter 4). The intake manifold can be removed leaving the rail and injectors in place.
7. Disconnect the pipe and gas recirculation valve from the manifold (see chapter 4).
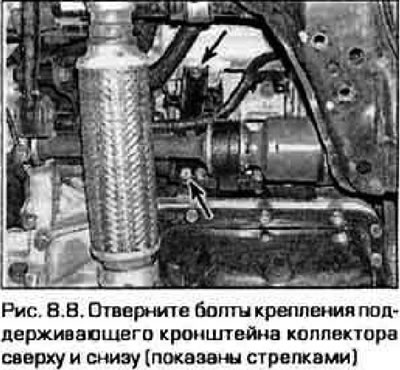
8. Unscrew the bolts and remove the support bracket for the inlet of the legs of the lecturer's trench (pic. 8.8).

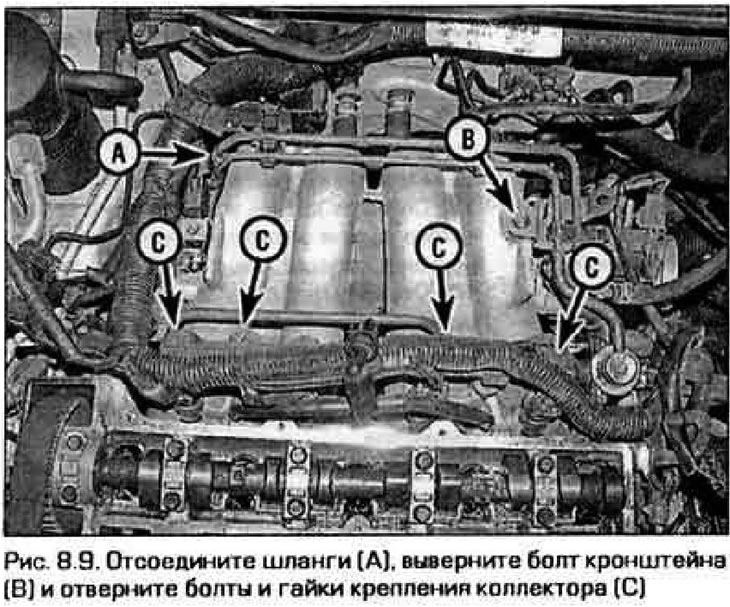
9. Held the collector on top, unscrew the bolts and nuts of its fastening (pic. 8.9).

10. Remove the intake manifold.
Installation
11. Carefully scrape off the remnants of the old gasket and sealant from the mounting surfaces of the manifold and cylinder head. Wash surfaces with solvent. If there are leaks from under the gasket, check if the mounting surface of the manifold is warped. Surface flatness can be restored by grinding.
12. Reinstall the manifold with a new gasket and fasten it with bots and nuts by hand.
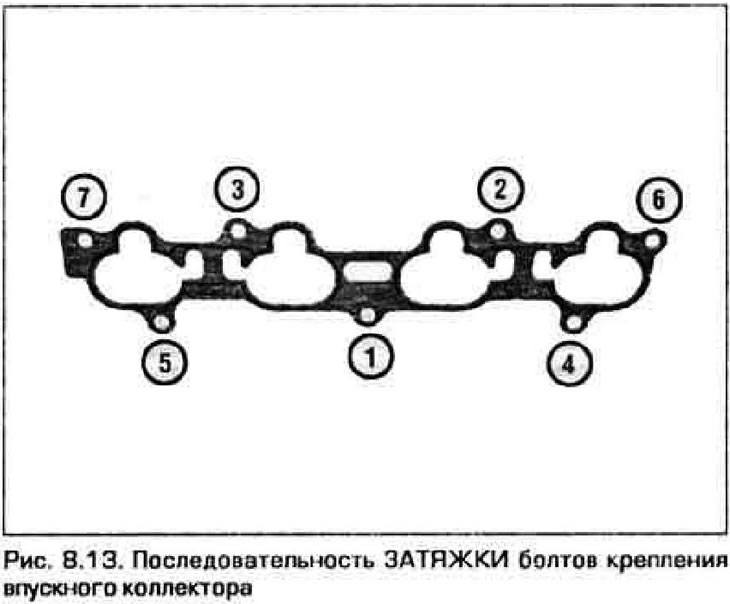
13. Tighten the bolts and nuts to the required torque in three or four steps in the sequence shown in fig. 8.13.

14. Establish other details in sequence, return to removal.
15. Before starting the engine, make sure that the throttle valve actuator operates without jamming.
16. Check the coolant level. Start the engine and check for coolant leaks or air leaks.
17. Take the car for a short drive and check that all vehicle systems, including cruise control, are working properly.
